With the node-red-contrib-pythonshell node installed we can start to execute python scripts in node-red. The node is configured with the path to the python file and a path to a virtual python environment which is optional but we recommend to create a virtual environment for each project to make it easier to handle dependencies, library updates and so on. The first step is to create a virtual environment, then install extra libraries. After that, we can create a python script file and execute it and show the output in a debug node, in the dashboard or do other things like sending an email, store it in Google sheets or send it to other service APIs. The first flow here is to create a bash file that will be stored in the data folder, executed and create a virtual environment called envtest. This flow is made to work on the rodened platform and will not work on a windows machine but could be modified to create a bat file instead.
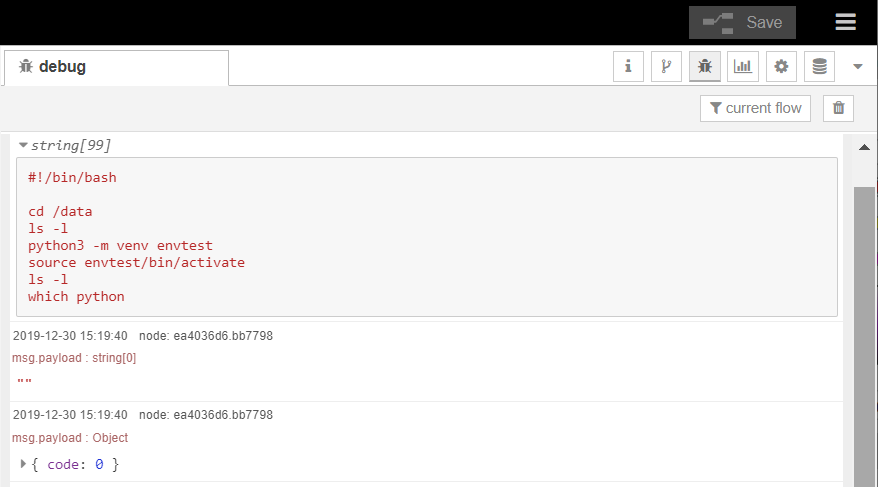
[{"id":"d49472cb.6086a","type":"tab","label":"python virtual environment","disabled":false,"info":""},{"id":"e9e4eaaa.3cff68","type":"inject","z":"d49472cb.6086a","name":"","topic":"","payload":"","payloadType":"date","repeat":"","crontab":"","once":false,"onceDelay":0.1,"x":100,"y":100,"wires":[["35d17b1b.5ad0e4"]]},{"id":"517d9cd8.c8b6d4","type":"file","z":"d49472cb.6086a","name":"","filename":"/data/create_env.sh","appendNewline":true,"createDir":false,"overwriteFile":"true","encoding":"none","x":430,"y":100,"wires":[["ef653223.cba51"]]},{"id":"35d17b1b.5ad0e4","type":"template","z":"d49472cb.6086a","name":"","field":"payload","fieldType":"msg","format":"python","syntax":"plain","template":"#!/bin/bash \n\ncd /data\nls -l\npython3 -m venv envtest\nsource envtest/bin/activate\nls -l\nwhich python","output":"str","x":260,"y":100,"wires":[["517d9cd8.c8b6d4"]]},{"id":"aee59794.e39e78","type":"inject","z":"d49472cb.6086a","name":"","topic":"","payload":"","payloadType":"date","repeat":"","crontab":"","once":false,"onceDelay":0.1,"x":100,"y":200,"wires":[["1e438f0b.d018d1"]]},{"id":"1e438f0b.d018d1","type":"exec","z":"d49472cb.6086a","command":"chmod u+x /data/create_env.sh","addpay":false,"append":"","useSpawn":"false","timer":"","oldrc":false,"name":"make create_env.sh file executable","x":340,"y":200,"wires":[["60e4efa1.2479e"],["60e4efa1.2479e"],["60e4efa1.2479e"]]},{"id":"60e4efa1.2479e","type":"debug","z":"d49472cb.6086a","name":"","active":true,"tosidebar":true,"console":false,"tostatus":false,"complete":"false","x":610,"y":200,"wires":[]},{"id":"e44ebb35.ef7ae8","type":"comment","z":"d49472cb.6086a","name":"create bash file that creates and activates venv","info":"In the template node we create a bash file that will create a virtual python environment and activate the environment.\n\n#!/bin/bash \n\ncd /data\nls -l\npython3 -m venv envtest\nsource envtest/bin/activate\nls -l\nwhich python","x":320,"y":60,"wires":[]},{"id":"bdab3472.4499d8","type":"comment","z":"d49472cb.6086a","name":"make the bash file executable","info":"","x":260,"y":140,"wires":[]},{"id":"b11065d2.3a7c28","type":"inject","z":"d49472cb.6086a","name":"","topic":"","payload":"","payloadType":"date","repeat":"","crontab":"","once":false,"onceDelay":0.1,"x":100,"y":320,"wires":[["98074b29.e032a8"]]},{"id":"98074b29.e032a8","type":"exec","z":"d49472cb.6086a","command":"bash /data/create_env.sh","addpay":false,"append":"","useSpawn":"true","timer":"","oldrc":false,"name":"execute create_env.sh","x":300,"y":320,"wires":[["48911cc3.c3bc04"],["48911cc3.c3bc04"],["48911cc3.c3bc04"]]},{"id":"48911cc3.c3bc04","type":"debug","z":"d49472cb.6086a","name":"","active":true,"tosidebar":true,"console":false,"tostatus":false,"complete":"false","x":610,"y":320,"wires":[]},{"id":"9a42ca96.0fa778","type":"comment","z":"d49472cb.6086a","name":"execute the bash file","info":"","x":250,"y":260,"wires":[]},{"id":"ef653223.cba51","type":"debug","z":"d49472cb.6086a","name":"","active":true,"tosidebar":true,"console":false,"tostatus":false,"complete":"false","x":610,"y":100,"wires":[]}]
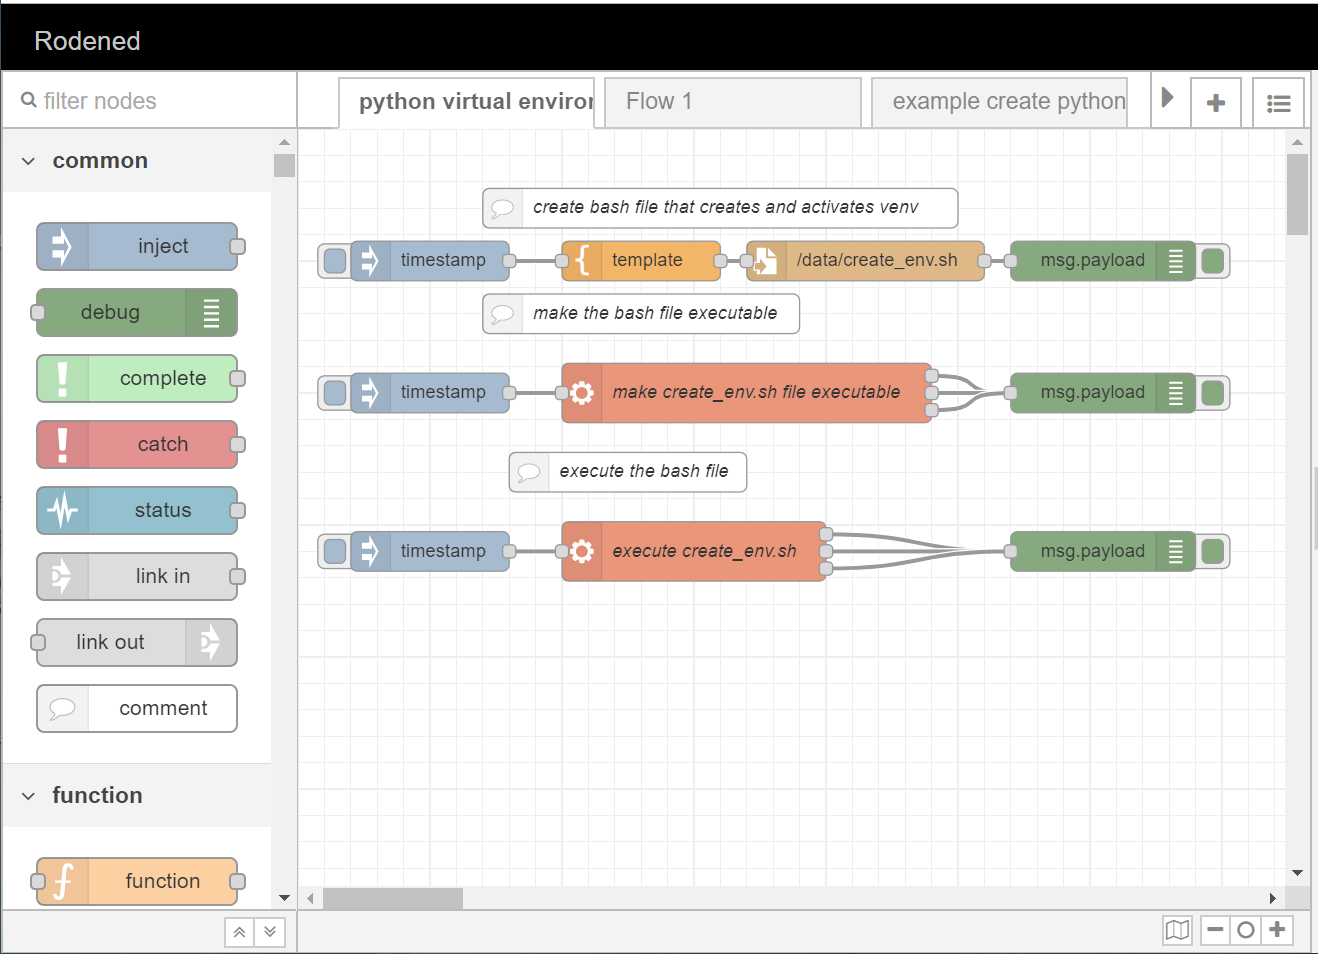
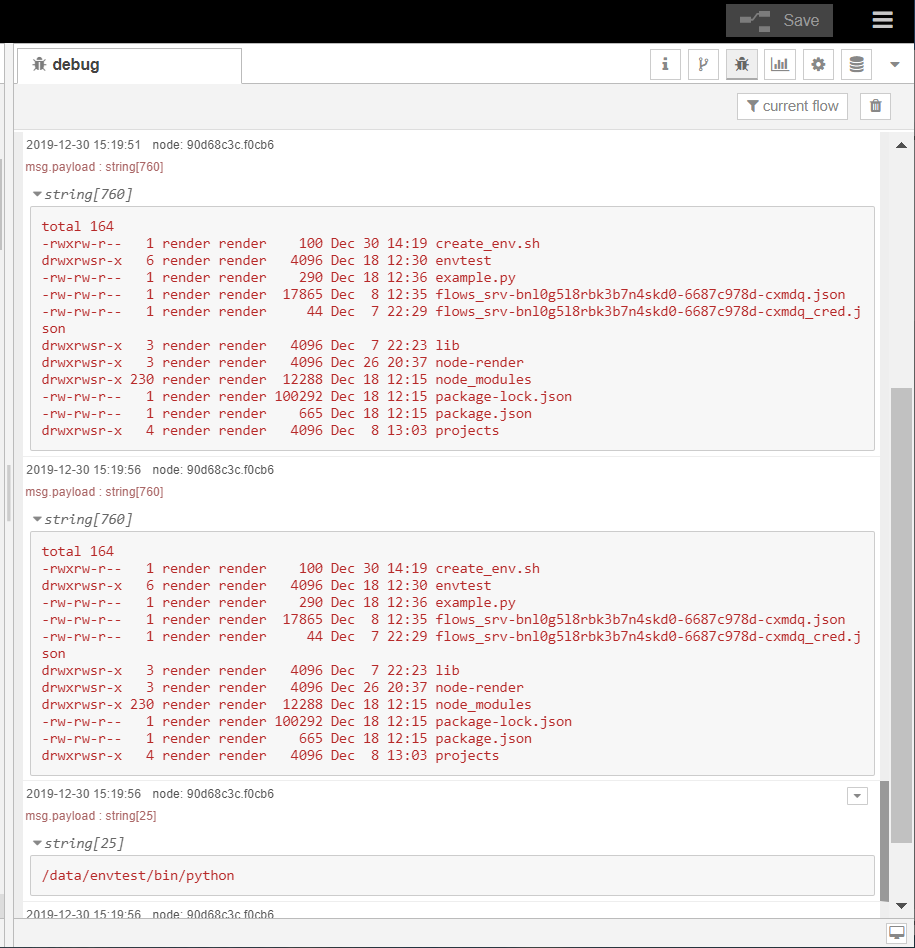
Copy the flow and use the import from the menu, and then deploy it with the Save button. To create the envtest virtual environment we execute each step by clicking on the button on the timestamp nodes. In the debug window to the right, we can see information about the execution and if there were any errors.
Install Python libraries
In this flow we will create a bash file that executes a python script that installs the sys library. If more than one library has to be installed we can add the next one after each other with a space between. If we add the Numpy library then the last row in the template file would be: pip3 install sys numpy.
[{"id":"642e27c5.0eeb98","type":"tab","label":"install python packages","disabled":false,"info":""},{"id":"e4713981.508268","type":"inject","z":"642e27c5.0eeb98","name":"","topic":"","payload":"","payloadType":"date","repeat":"","crontab":"","once":false,"onceDelay":0.1,"x":140,"y":240,"wires":[["2ee1606c.70d3e"]]},{"id":"2ee1606c.70d3e","type":"exec","z":"642e27c5.0eeb98","command":"chmod u+x /data/install_packages.sh","addpay":false,"append":"","useSpawn":"true","timer":"","oldrc":false,"name":"make install_packages.sh file executable","x":440,"y":240,"wires":[["2cfd991.bcfa966"],["2cfd991.bcfa966"],["2cfd991.bcfa966"]]},{"id":"2cfd991.bcfa966","type":"debug","z":"642e27c5.0eeb98","name":"","active":true,"tosidebar":true,"console":false,"tostatus":false,"complete":"false","x":710,"y":240,"wires":[]},{"id":"16b7d076.1c476","type":"inject","z":"642e27c5.0eeb98","name":"","topic":"","payload":"","payloadType":"date","repeat":"","crontab":"","once":false,"onceDelay":0.1,"x":140,"y":380,"wires":[["293c547b.5f72ec"]]},{"id":"293c547b.5f72ec","type":"exec","z":"642e27c5.0eeb98","command":"bash /data/install_packages.sh","addpay":false,"append":"","useSpawn":"true","timer":"","oldrc":false,"name":"execute /install_packages.sh","x":400,"y":380,"wires":[["8084497e.9f2128"],["8084497e.9f2128"],["8084497e.9f2128"]]},{"id":"8084497e.9f2128","type":"debug","z":"642e27c5.0eeb98","name":"","active":true,"tosidebar":true,"console":false,"tostatus":false,"complete":"false","x":630,"y":380,"wires":[]},{"id":"5c0b3bec.0ad8e4","type":"comment","z":"642e27c5.0eeb98","name":"make the bash file executable","info":"","x":340,"y":180,"wires":[]},{"id":"e897aa68.48d5a8","type":"inject","z":"642e27c5.0eeb98","name":"","topic":"","payload":"","payloadType":"date","repeat":"","crontab":"","once":false,"onceDelay":0.1,"x":140,"y":120,"wires":[["7f2ed388.0d91bc"]]},{"id":"547f47c2.729918","type":"file","z":"642e27c5.0eeb98","name":"","filename":"/data/install_packages.sh","appendNewline":true,"createDir":false,"overwriteFile":"true","encoding":"none","x":650,"y":120,"wires":[[]]},{"id":"7f2ed388.0d91bc","type":"template","z":"642e27c5.0eeb98","name":"file to install packages","field":"payload","fieldType":"msg","format":"python","syntax":"plain","template":"#!/bin/bash \n\ncd /data\nsource envtest/bin/activate\nls -l\nwhich python\npip3 install sys","output":"str","x":380,"y":120,"wires":[["547f47c2.729918"]]},{"id":"ff6d8ba8.78a728","type":"comment","z":"642e27c5.0eeb98","name":"create bash file that installs packages","info":"","x":310,"y":80,"wires":[]},{"id":"1d628f3b.25cb81","type":"comment","z":"642e27c5.0eeb98","name":"execute the bash file to install packages","info":"","x":370,"y":320,"wires":[]}]
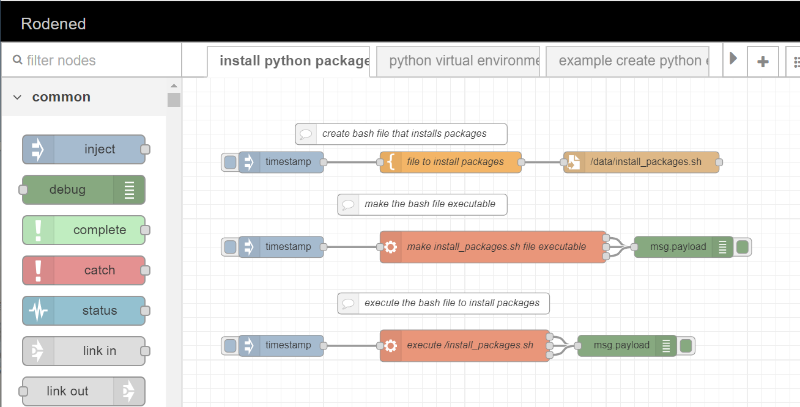
When we execute the timestamp nodes we can see the status from the debug nodes in the debug window. The information is the same as if the command line where used.
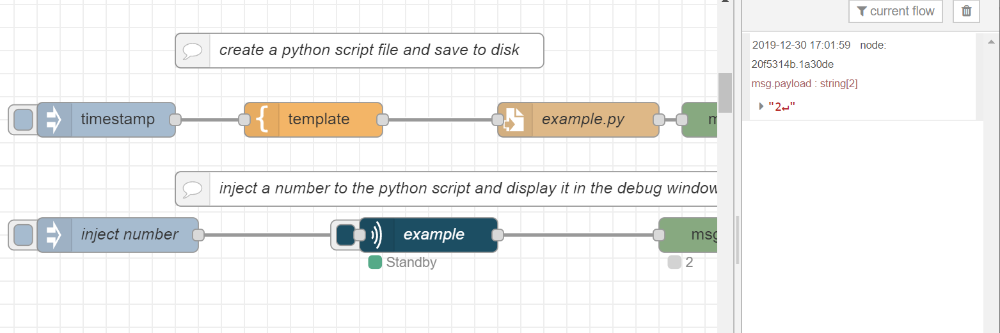
Create and execute the Python script
To create a python script we will use the template node and save it to the data folder. This python script is a simple function that returns the absolut number of the entered value which is inserted from the inject node.
[{"id":"709cc66c.0133e8","type":"template","z":"dbb46e58.4c652","name":"","field":"payload","fieldType":"msg","format":"python","syntax":"plain","template":"import sys\n\ndef absolute_value(num):\n\t\"\"\"This function returns the absolute\n\tvalue of the entered number\"\"\"\n\n\tif num >= 0:\n\t\treturn num\n\telse:\n\t\treturn -num\n\n# Output: 2\n#print(absolute_value(2))\n\nwhile True:\n num = sys.stdin.readline() # read the stdin from the inject node\n num = int(num)\n print(absolute_value(num))","output":"str","x":320,"y":180,"wires":[["adae6ef4.063fa"]]}]
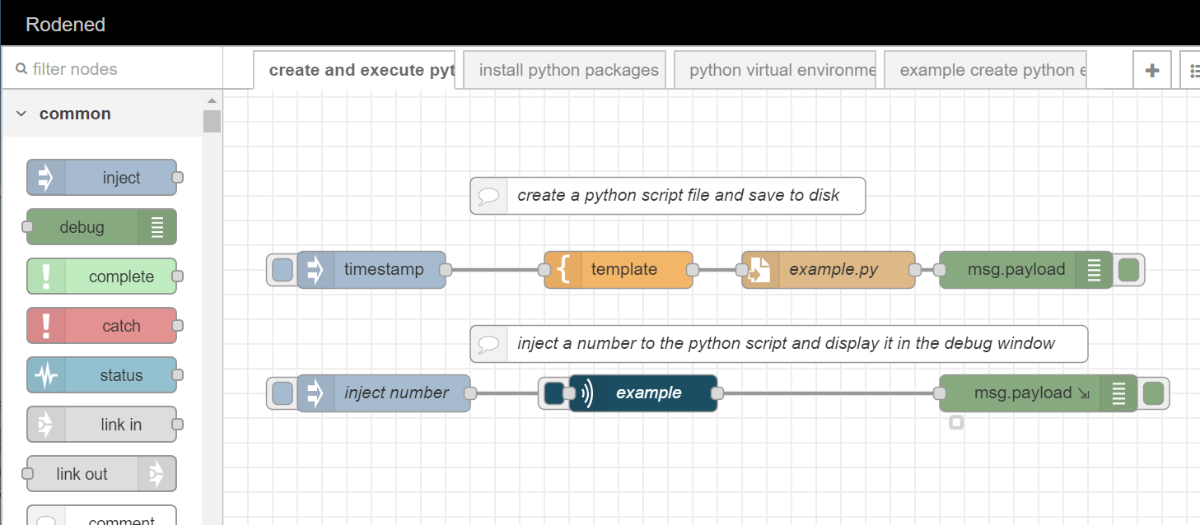
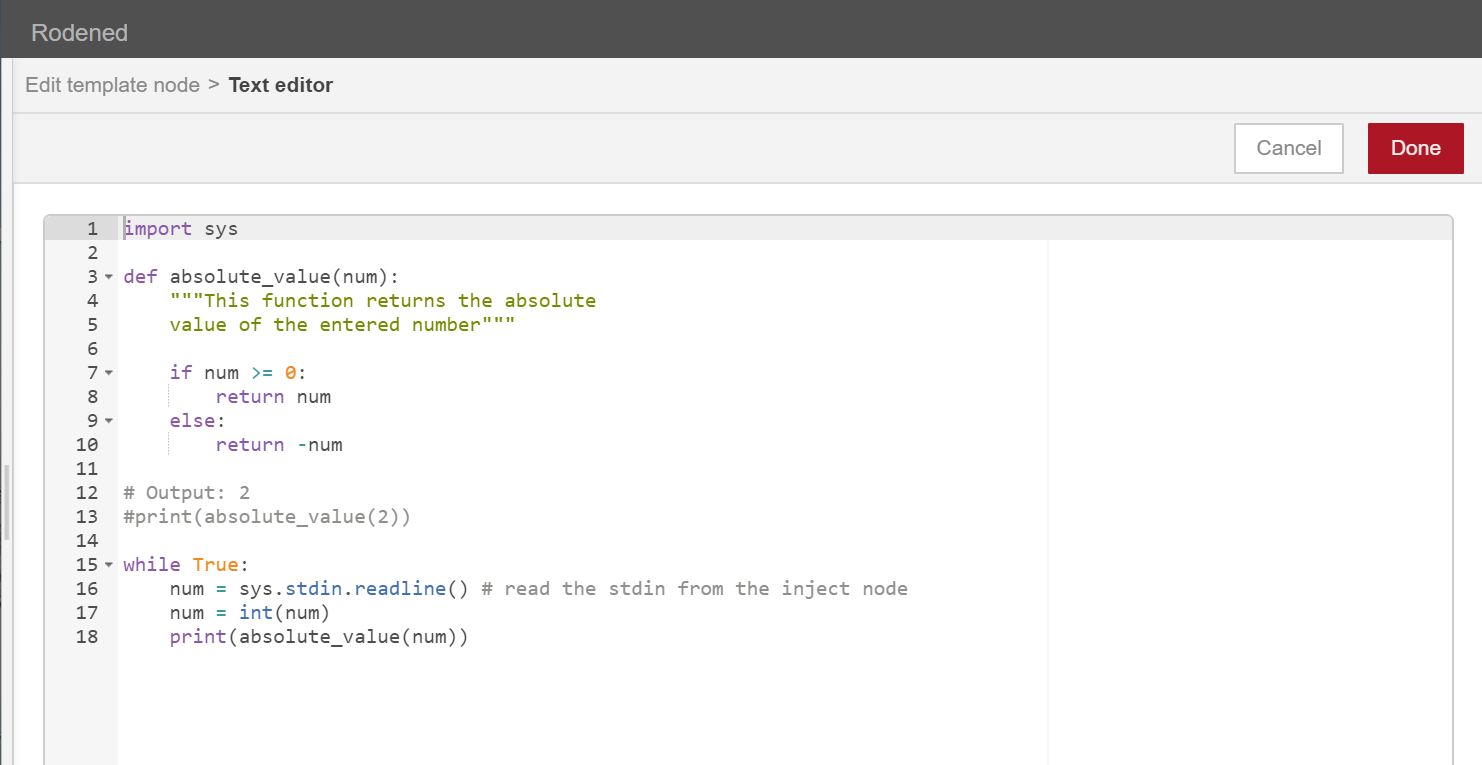
On row 15 to 18 we read the information from the inject node and execute the function absolute_value which is printed and shown with the debug node.